
İçindekiler:
- Yazar John Day day@howwhatproduce.com.
- Public 2024-01-30 13:19.
- Son düzenleme 2025-01-23 15:13.


Salut les Makers:) c'est Maker3.0
Notre premier "eğitilebilir" en küçük projet qui va vous permettre de contrôler ve moteur geçişleri "Step Motor" vitesse son sens de rotasyon ve cela de façon manuelle ve automatique ! Suivez-nous:)
1. Adım: Gösteri
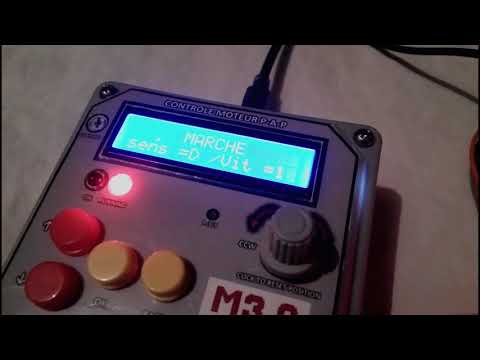

Voici un premier aperçue du projet et de sa simülasyon sur isis Proteus, on va détailler tous les étapes juste en bas … C'est part
2. Adım: Elements Constitutif Du Projet


Arduino Uno auquel sont connecté un encrant LCD, 4 boutons, un enkoder, et 2 voyant rouge et vert.
4 Broche de l'Arduino sont positionné en le coté droit du boitier pour connecté le sürücüsü ULN2003, bir pasa pilotla gezin.
Not: vous aurez remarquer que l'ULN2003 et alimenté seul, ceci est pour éviter la chute de tansiyon car il consomme beaucoup d'énergie !
Adım 3: Des Composant'ları Listeleyin


1 x Adruino uno
4 x Yaka Çivileri
2 x LED (Kızartma, Verte)
1 x Enkoder KY-040
1 x Ecran LCD 16x2
1 x Potansiyometre
1 x Moteur pas a pas (ici le 28 BYJ)
1 x Sürücü ULN2003
1 x Plak perforé PCB soudure dökün
1 x Boitier (ici une boite de dérivation Electrique fera l'affaire)
des Cables relier le tous dökün
aura üzerinde le coté logicielles dökün besoin de l'IDE arduino dökün kodé ve isis Proteus la simülasyon ve fritzing la maket dökün.
Adım 4: Schéma Et Simülasyonu


Adım 5: Principe De Fonctionnement


Le boitier ce compose de 4 bouton (Haut, Bas, Entré et Retour) navigué dans les menues dökün:
1 _ Sens: // choisir le sens de rotasyon du moteur sens horaire ve antihoraire
mastar *
droit
2 _ Vitesse: // choisir la vitesse de rotasyon du moteur entre les trois vitesse disponible
1 *
Vitesse 2
Vitesse 3
3 _ Demarrer ? // lancée le program avec les paramètres prédéfinie
4 _ Manuel // elle seçim yapma kılavuzu
Not: Bir pozisyonun bir fonctionnalité de hafızaya alınmasını kodlayın, bir pozisyonun ilk harfini değiştirin!
Adım 6: Et Simulations a Télécharger'ı Kodlar

Voici ici présent le code Arduino la simülasyonu isis et le schema fritzing
7. Adım: Sonuç

En iyi nesnel proje, en önde gelen pédagogique, et de plus avec un peut de péut facilement üzerinde modifikasyonlar l'adapté, d'autre utilités, en se temel sur la technologie Arduino ve un peux d'électronique de bricolage ve un tahıl peut faire beaucoup mieux que ça !
Adım 8: Suivez-nous…

Facebook: Maker3.0
Instagram: makertroispointzero
Youtube: Yapıcı 3.0
E-posta: makertroispointzero@gmail.com veya zehraoui.walid@gmail.com
Zehraui Velid
Önerilen:
Step Motor Kontrollü Mikrodenetleyicisiz Step Motor!: 6 Adım

Mikrodenetleyicisiz Step Motor Kontrollü Step Motor!: Bu hızlı Eğitimde, bir step motor kullanarak basit bir step motor kontrolörü yapacağız. Bu proje, karmaşık devre veya mikro denetleyici gerektirmez. O halde lafı fazla uzatmadan başlayalım
Step Motor Kontrollü Mikrodenetleyicisiz Step Motor(V2): 9 Adım (Resimli)
: 9 Adım (Resimli)")
Step Motor Kontrollü Mikrodenetleyicisiz Step Motor(V2): Önceki Derslerimden birinde, mikrodenetleyicisiz bir step motor kullanarak bir step motoru nasıl kontrol edeceğinizi gösterdim. Hızlı ve eğlenceli bir projeydi ancak bu Eğitilebilir Tabloda çözülecek iki problemle geldi. Yani, zeka
Step Motor Kontrollü Model Lokomotif - Döner Enkoder Olarak Step Motor: 11 Adım (Resimlerle)
")
Step Motor Kontrollü Model Lokomotif | Döner Kodlayıcı Olarak Adım Motoru: Önceki Talimatlardan birinde, bir step motorun döner kodlayıcı olarak nasıl kullanılacağını öğrendik. Bu projede, şimdi bir Arduino mikrodenetleyici kullanarak bir model lokomotifi kontrol etmek için step motorlu döner kodlayıcıyı kullanacağız. Yani, fu olmadan
Step Motor Kontrollü Step Motor - Döner Enkoder Olarak Step Motor: 11 Adım (Resimlerle)
")
Step Motor Kontrollü Step Motor | Döner Kodlayıcı Olarak Step Motor: Etrafta duran ve bir şeyler yapmak isteyen birkaç step motor var mı? Bu Eğitilebilir Tabloda, bir Arduino mikro denetleyici kullanarak başka bir step motorun konumunu kontrol etmek için döner kodlayıcı olarak bir step motor kullanalım. O halde lafı fazla uzatmadan geçelim
Arduino Eğitimi - Sürücü ULN 2003 ile Step Motor Kontrolü: 5 Adım

Arduino Eğitimi - Sürücü ULN 2003 ile Step Motor Kontrolü: Bu talimat, "Arduino: ULN 2003 Motor Sürücüsü ile Bir Step Motoru Nasıl Kontrol Edilir" kitabımın yazılı versiyonudur. Geçenlerde yüklediğim YouTube videosu. incelemenizi şiddetle tavsiye ederim